
ARTICLE
How To Configure GS DevOps Mate for Bit Bucket Pipelines
Though I want the setup article to be as concise as possible, a few concepts can pose challenges if left unexplained. You are always welcome to jump directly to the next section which talks about the steps to configure. I would highly recommend you to go through the Tell Me More Buttons as and when they appear!

Before we start, we will be assuming that you have a BitBucket repo setup with Admin access in SFDX format and a ‘main’ branch. If you have a master branch instead of main, replace main with master wherever we are referring to main.
The setup will involve the following steps:
- Configure your build runtime environment
- Define deployment environments
- Define environment variables
- Configure the pipelines
- Testing the pipelines
1. Build Runtime Configuration
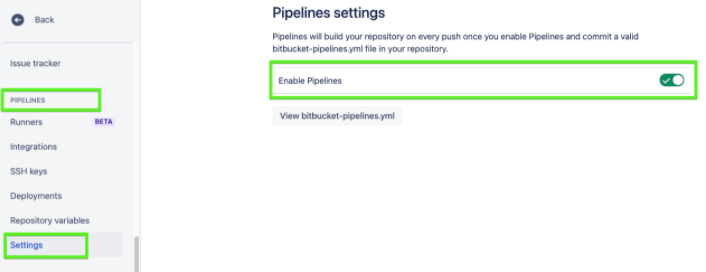
Enable the Pipelines.
Go to Repository Settings => Pipelines => Settings => Enable Pipelines
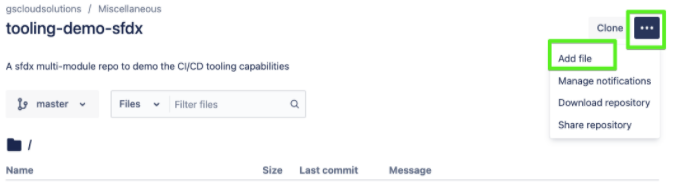
Create a YAML file by the name bitbucket-pipelines.yml in the root of the repository, as shown below with the image command. Make sure that the name is the same.
This step sets the GS DevOps Mate Docker image as the build runtime. All other commands would now run under the context of this image or simply saying will run under the GS DevOps Mate Docker runtime and thus will have access to all the custom commands and resources we have packaged/dockerized in it.
2. Define Deployment Variables
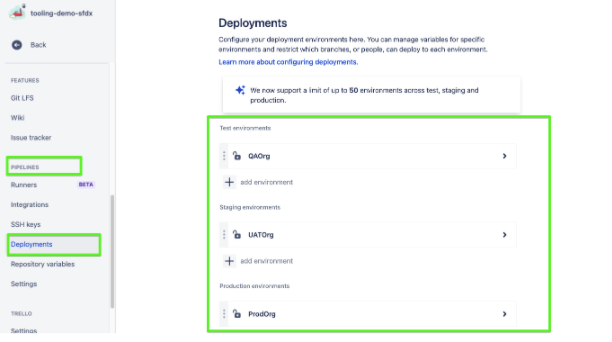
- Go to Pipelines => Deployments
- Create QAOrg, UATOrg, and ProdOrg environments under Test, Staging, and Production environments, respectively.
3. Define Repo Variables
You may wonder what are these $SOME_TEXT things in the steps defined below. So let’s discuss and sort them first. These are Pipeline variables. They come in three flavors.
- Repository Variables: User-defined. We will be defining these soon. e.g. DEVHUB_ORG_TYPE, UAT_ORG_TYPE, LATEST_COMMIT_HASH_TAG
- Environment Variables: User-defined (We will not be using them in this post but you can define them in the Environment step which we did previously. Can use exactly like Repository variables as long as you have referenced the environment in your step)
- Default Variables: Provided by the CI/CD service. So they will vary as we move from one service to another during this blog posts series.
e.g. BITBUCKET_CLONE_DIR, BITBUCKET_BUILD_NUMBER
Let’s define Repository variables:
Go to Pipelines => Repository Variables
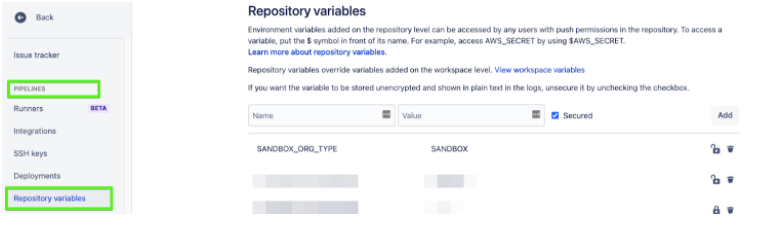
Define these variables with the following values:
LATEST_COMMIT_HASH_TAG: HEAD
SLACK_MESSAGES: off
MIN_OVERALL_CODE_COVERAGE: 90 (Can be anything from 75 to 100)
CI_CD_PROVIDER: BBPipelines
MAJOR_VERSION: 1
MINOR_VERSION: 0
PATCH: 0
TEST_LEVEL: RunLocalTest or RunSpecifiedTest or RunNoTests
MANIFEST_VERSION: 50
LOGGING_LEVEL: error or warn or info or debug or trace
QA_PACKAGE_DIR: QADir
UAT_PACKAGE_DIR: UATDir
PROD_PACKAGE_DIR: ProdDir
QA_ORG_TYPE: Sandbox
UAT_ORG_TYPE: Sandbox
PROD_ORG_TYPE: Production
QA_ORG_USERNAME: Username for a QA Org user with enough rights to deploy, Create, Read and Update custom settings data, preferably someone like System Administrator
QA_ORG_PASSWORD: Password and Security Token concatenated for the above user
e.g mySecretPasswordmySecretToken
UAT_ORG_USERNAME: Username for a UAT Org user with enough rights to deploy, Create, Read and Update custom settings data, preferably someone like System Administrator
UAT_ORG_PASSWORD: Password and Security Token concatenated for the above user
PROD_ORG_USERNAME: Username for a Production Org user with enough rights to deploy, Create, Read and Update custom settings data, and create Scratch Orgs, preferably someone like System Administrator
PROD_ORG_PASSWORD: Password and Security Token concatenated for the above user
4. Configure A Pipeline
As an example, we will configure the Feature Branch Workflow also known as GitHub Flow or GitHub Workflow as part of our CI/CD pipeline.
You can refer to this visual for the pipeline we are configuring here:
STEPS
In the bitbucket-pipelines.yaml file created above we will start adding pipelines and steps as part of these pipelines
The first pipeline is Pull Request Validation Pipeline:
1
pipelines:
pull-requests:
feature/*: #any branch with a feature prefix
#----------------------------Step 1------------------------------------
- step:
name: Creating Deployment Package for CI(Continuous Integration)
script:
- echo 'Getting Target Org Status From QA/Partial Dev Org'
- sfDeploymentInfo get -u $QA_ORG_USERNAME -t $QA_ORG_TYPE -i $BITBUCKET_BUILD_NUMBER -n All -s $QA_ORG_PASSWORD
- echo 'Creating a Git Diff based artifact/package'
- sfPackages source-combined -p $BITBUCKET_CLONE_DIR/$QA_PACKAGE_DIR -n $LATEST_COMMIT_HASH_TAG -i $BITBUCKET_BUILD_NUMBER || if test $? -eq 21; then exit 0; else exit 1; fi
- echo 'Scanning Source Code'
- sfScan pmd-eslint -t "$BITBUCKET_CLONE_DIR/$QA_PACKAGE_DIR/Artifacts/"
artifacts:
- QADir/Artifacts/**
Step One
Triggered On: Pull Request from feature branch (Regex ‘feature/*’ can be modified to support trigger from different branches if you wish)
Actions:
- Creates a delta package based on the last successful deployment commit, which is stored in the target org.
- Runs a PMD and ESLint based Static Code Analysis (Currently if any violation with severity 1 is found, the pipeline will fail at this step itself)
- Marks the package created as an artifact to be utilized in later steps
#----------------------------Step 2-------------------------------------
- step:
name: Scratch Org Deployment Validation
script:
- echo 'Create Scratch Org'
- sfOrgs createOrg -x 'CIOrg-$BITBUCKET_BUILD_NUMBER' -p ./config/project-scratch-def.json -t $PROD_ORG_TYPE -u $PROD_ORG_USERNAME -s $PROD_ORG_PASSWORD
- echo 'Create a full deployment artifact/package'
- sfPackages source-combined -f true -v $MAJOR_VERSION.$MINOR_VERSION.$PATCH.$BITBUCKET_BUILD_NUMBER -p $BITBUCKET_CLONE_DIR -n $LATEST_COMMIT_HASH_TAG || if test $? -eq 21; then exit 0; else exit 1; fi
- echo 'Deploy the package to Scratch Org'
- sfDeploy mdapipackage -L $TEST_LEVEL -p $BITBUCKET_CLONE_DIR -a 'CIOrg-$BITBUCKET_BUILD_NUMBER' -v $MAJOR_VERSION.$MINOR_VERSION.$PATCH.$BITBUCKET_BUILD_NUMBER
Step Two
2
Triggered On: Completion of Step 1
Actions:
- Creates a Scratch Org
- Creates a full repo package to be deployed to Scratch Org
- Deploys the package to the Scratch Org
Special Instructions: For the scratch org creation command which is sfOrgs createOrg, make sure to have a project-scratch-def.json file in the config folder in your repo
Step Three
#-------------------------------Step 3----------------------------------
- step:
name: Deployment Validation On QA/Partial-Dev Org/Environment
script:
- echo 'Getting Target Org Status From QA/Partial Dev Org'
- sfDeploymentInfo get -u $QA_ORG_USERNAME -t $QA_ORG_TYPE -i $BITBUCKET_BUILD_NUMBER -n All -s $QA_ORG_PASSWORD
- echo 'Deployment Validation On QA/Partial-Dev Org.'
- sfDeploy mdapipackage -p $BITBUCKET_CLONE_DIR/$QA_PACKAGE_DIR -c true -u $QA_ORG_USERNAME -s $QA_ORG_PASSWORD -t $QA_ORG_TYPE --successSHA $LATEST_COMMIT_HASH_TAG -i $BITBUCKET_BUILD_NUMBER -l $TEST_LEVEL
artifacts:
- QADir/Artifacts/**
3
Triggered On: Completion of Step 2
Actions: Runs a Deployment validation based on the artifact created in Step1 on the QA or a CI Org
Notes:
- You can choose to go with Step 2 or Step 3. If you are not using Scratch Orgs in your development model, you do not need Step 2. If you are using Scratch Orgs and your project is not a huge one and the whole Scratch Org deployment can be done fairly quickly based on your requirements, you can go with both step 2 and step 3. If you have a huge project, Step 2 can be moved to a custom deployment pipeline which can be run daily on a scheduled basis. We will cover this in more details towards the end of this section.
- Once this pipeline is green and the code review is done, you are good to merge the feature branch to the main or the master branch.
Now we will define the second pipeline and look into its steps. We can name it Deployment Pipeline.
# Pipeline for the master branch
branches:
'main':
#--------------------------------Step 4----------------------------------
# Automated step as BB Pipeline can not start with a manual step
- step:
name: Feature Ready for QA
script:
- echo 'Ready for QA'
Step Four
Triggered On: When the feature branch is merged to the main branch
Action: Echoes a custom message.
Special Instructions: This is a dummy step, as BitBucket Pipelines can not start with a manual step and step 5 is a manual or approval based step
4
#QA Org Deployment
- step:
name: QA Org Deployment
deployment: QAOrg
trigger: manual
script:
- echo 'Getting Target Org Status From QA Org'
- sfDeploymentInfo get -u $QA_ORG_USERNAME -t $QA_ORG_TYPE -i $BITBUCKET_BUILD_NUMBER -n All -s $QA_ORG_PASSWORD
- echo 'Creating a Git Diff based artifact/package'
- sfPackages source-combined -p $BITBUCKET_CLONE_DIR/$QA_PACKAGE_DIR -n $LATEST_COMMIT_HASH_TAG -i $BITBUCKET_BUILD_NUMBER || if test $? -eq 21; then exit 0; else exit 1; fi
- echo 'Deployment On QA Org.'
- sfDeploy mdapipackage -p $BITBUCKET_CLONE_DIR/$QA_PACKAGE_DIR -u $QA_ORG_USERNAME -s $QA_ORG_PASSWORD -t $QA_ORG_TYPE --successSHA $LATEST_COMMIT_HASH_TAG -i $BITBUCKET_BUILD_NUMBER -l RunLocalTests
5
Step Five
Triggered On: Manual Run/Approval
Action:
- Creates a delta package for deployment to QA Org
- Deploys the package to QA Org
#--------------------------------Step 6----------------------------------
- step:
name: Creating Package for UAT Org Deployment
trigger: manual
script:
- echo Getting Target Org Status from UAT Org
- sfDeploymentInfo get -u $UAT_ORG_USERNAME -t $UAT_ORG_TYPE -i $BITBUCKET_BUILD_NUMBER -n All -s $UAT_ORG_PASSWORD
- echo Creating a Git Diff based artifact/package
- sfPackages source-combined -p $BITBUCKET_CLONE_DIR/$UAT_PACKAGE_DIR -n $LATEST_COMMIT_HASH_TAG -i $BITBUCKET_BUILD_NUMBER || if test $? -eq 21; then exit 0; else exit 1; fi
artifacts:
- UATDir/Artifacts/**
Step Six
6
Triggered On: Manual Run/Approval
Action:
- Creates a delta package for deployment to UAT Org
- Marks the package as an Artifact to be used in further steps
#--------------------------------Step 7----------------------------------
- step:
name: UAT Validation
script:
- echo Getting Target Org Status from UAT Org
- sfDeploymentInfo get -u $UAT_ORG_USERNAME -t $UAT_ORG_TYPE -i $BITBUCKET_BUILD_NUMBER -n All -s $UAT_ORG_PASSWORD
- echo UAT Org Deployment
- sfDeploy mdapipackage -p $BITBUCKET_CLONE_DIR/$UAT_PACKAGE_DIR -c true -u $UAT_ORG_USERNAME -s $UAT_ORG_PASSWORD -t $UAT_ORG_TYPE --successSHA $LATEST_COMMIT_HASH_TAG -i $BITBUCKET_BUILD_NUMBER -l RunLocalTests
7
Step Seven
Triggered On: On completion of Step 6
Action: Runs a deployment validation based on the package created in Step 6 on the UAT Org
#---------------------------------Step 8---------------------------------
- step:
name: UAT Quick Deployment
deployment: UATOrg
trigger: manual
script:
- echo Getting Target Org Status from UAT Org
- sfDeploymentInfo get -u $UAT_ORG_USERNAME -t $UAT_ORG_TYPE -i $BITBUCKET_BUILD_NUMBER -n All -s $UAT_ORG_PASSWORD
- echo UAT Org Deployment
- sfDeploy quick-deploy -p $BITBUCKET_CLONE_DIR/$UAT_PACKAGE_DIR -u $UAT_ORG_USERNAME -s $UAT_ORG_PASSWORD -t $UAT_ORG_TYPE --successSHA $LATEST_COMMIT_HASH_TAG -i $BITBUCKET_BUILD_NUMBER
Step Eight
Triggered On: Manual Run/Approval
Action: Runs a deployment based on the package created in Step 6 on the UAT Org
8
#---------------------------------Step 9----------------------------------
- step:
name: Creating Package for Prod Org Deployment
trigger: manual
script:
- echo Getting Target Org Status from Prod Org
- sfDeploymentInfo get -u $PROD_ORG_USERNAME -t $PROD_ORG_TYPE -i $BITBUCKET_BUILD_NUMBER -n All -s $PROD_ORG_PASSWORD
- echo Creating a Git Diff based artifact/package
- sfPackages source-combined -p $BITBUCKET_CLONE_DIR/$PROD_PACKAGE_DIR -n $LATEST_COMMIT_HASH_TAG -i $BITBUCKET_BUILD_NUMBER || if test $? -eq 21; then exit 0; else exit 1; fi
artifacts:
- ProdDir/Artifacts/**
9
Step Nine
Triggered On: Manual Run/Approval
Action:
- Creates a delta package for deployment to Production Org
- Marks the package as an Artifact to be used in further steps
#--------------------------------Step 10----------------------------------
- step:
name: Prod Validation
script:
- echo Getting Target Org Status from Prod Org
- sfDeploymentInfo get -u $PROD_ORG_USERNAME -t $PROD_ORG_TYPE -i $BITBUCKET_BUILD_NUMBER -n All -s $PROD_ORG_PASSWORD
- echo UAT Org Deployment
- sfDeploy mdapipackage -p $BITBUCKET_CLONE_DIR/$PROD_PACKAGE_DIR -c true -u $PROD_ORG_USERNAME -s $PROD_ORG_PASSWORD -t $PROD_ORG_TYPE --successSHA $LATEST_COMMIT_HASH_TAG -i $BITBUCKET_BUILD_NUMBER -l RunLocalTests
Step Ten
Triggered On: On completion of Step 9
Action: Runs a deployment validation based on the package created in Step 9 on the Production Org
10
#--------------------------------Step 11---------------------------------
- step:
name: Prod Quick Deployment
deployment: ProdOrg
trigger: manual
script:
- echo Getting Target Org Status from UAT Org
- sfDeploymentInfo get -u $PROD_ORG_USERNAME -t $PROD_ORG_TYPE -i $BITBUCKET_BUILD_NUMBER -n All -s $PROD_ORG_PASSWORD
- echo UAT Org Deployment
- sfDeploy quick-deploy -p $BITBUCKET_CLONE_DIR/$PROD_PACKAGE_DIR -u $PROD_ORG_USERNAME -s $PROD_ORG_PASSWORD -t $PROD_ORG_TYPE --successSHA $LATEST_COMMIT_HASH_TAG -i $BITBUCKET_BUILD_NUMBER
11
Step Eleven
Triggered On: Manual Run/Approval
Action: Runs a deployment based on the package created in Step 9 on the Production Org
With this we are good to save the bitbucket-pipelines.yaml file. You can find the whole file here.
5. Test the pipelines
Finally, we are ready to test the pipelines
Testing PR Validation pipelines: Create a PR from a feature branch to the main branch. This will kick off the PR Validation Pipeline. Make sure that your feature branch is following the naming convention which is feature/<any-valid-name>
e.g. feature/rks-221
Please note that based on the regex we defined in the pipeline YAML file, something like feature/rohan/rks-221 will not work, instead, you have to go with feature/rohan-rks-221 or you have to change the regex in the YAML
Testing Deployment Pipeline: Once the PR validation pipeline is successful and you are happy to merge, merge the feature branch to main. That will kick off the deployment pipeline.
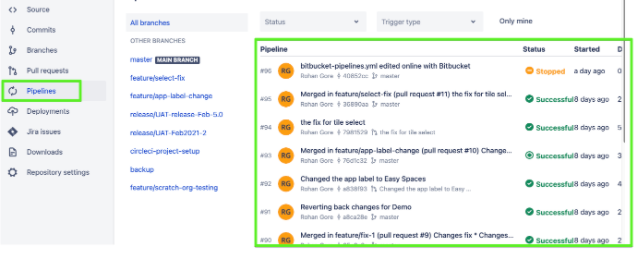
These pipelines can be monitored and checked by clicking on the Pipelines tab and then clicking on the individual pipelines.
MORE ON CI/CD SERVICES
What one would you like to see first?
Next time, we will cover how to configure and run the same CI/CD workflow on one of the other CI/CD services:
Azure DevOps, Circle CI, or GitHub Actions.
Please feel free to let us know which one would you like to see first or if you have any other questions.
Copyright © 2021. All rights reserved.

